A PDF of this file is also available
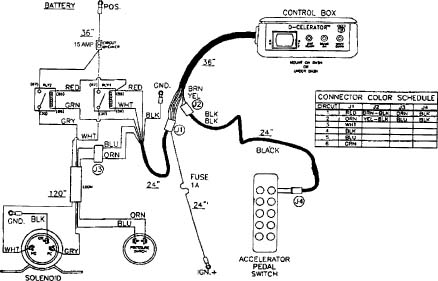
D-Celerator Diesel Exhaust Brake Troubleshooting Guide
How the D-Celerator Works All U.S. Gear solenoid-actuated exhaust brakes operate on the same principle electronically. This includes Super Duty models (1st and 2nd design), Standard models (orifice-regulated), and 4" Super Duty electric models. D-Celerator units have an electric solenoid mounted to the cast housing. Three wires are attached to the solenoid using either a weatherproof connector, or with small screws through eyelets on tabs on the back of the solenoid housing. Each solenoid is equipped with two coils with differing functions. The gray wire in the harness is used to power up the first coil, called the `pull' coil. This requires about 55 amps at 12 volts to close the exhaust brake's butterfly valve. The second coil is the `hold' coil, and it usually operates at the same time as the pull coil. The hold coil requires much less amps, less than 2. The third wire is the ground connection (could be black or green). Most important, it needs a good clean connection to the frame of the truck, or other good ground on motor home applications. The second component is the Electronic Control Module (ECM). There are three different models of modules. They look different, but have the same method of operation. The first design of the ECM is a small, flat box about 3"x3"x1", generally mounted on or under the dash. It has a rocker on/off switch and three LEDs:
The second design of the ECM is similar in appearance to the first. It has a rocker on/off switch, and Green and Red LEDs. When the vehicle key is in the `run' position, the Green LED will illuminate. When the rocker switch is `on', both the Green and the Red LEDs will be illuminated. There is no wireless remote required, and there is no Yellow "shift down light." The second design also has the Cycle Feature at power up. With the cycle feature, the Green LED will blink at power up for approximately 15 seconds, then the butterfly valve will close and open two times. The third design of the ECM is a black box approximately 2"x2"x4" with seven wires and a pigtail attached, and should be mounted under the dash. This design uses a wired remote switch to turn the unit on or off. The wired remote has a single Red LED. When the vehicle key is put into the 'run' position, the LED will blink indicating a 15 second countdown to the Cycle Feature. After the butterfly cycles closed and open two times, the LED will not be illuminated until the button is pressed to turn the D-Celerator on.
|
The last major component of the D-Celerator is the wiring harness that connects the other parts together.
Two types of wiring harnesses are used.
The first design and second design ECMs use a harness with two external relays which are usually located under the hood, or in the engine compartment on rear engine motor homes. The two relays control the Pull and Hold coil electricity in proper timing.
The third design ECM has the relays in the module itself, and the relays are not serviceable independent of the module. Battery power is brought to the ECM by a large, 10 gauge red wire using a spade connector. A gray and a white wire are spade-connected to the module and go to the solenoid. Next is the pigtail from the wired remote switch. Finally, there is a 4-position wire plug with small red, black (or green), brown, and yellow wires. The red wire is for 12 volt key controlled power. Green is ground. The brown and yellow wires are for the D-Feat switch (of various types).
The final component of the D-Celerator is the D-Feat Switch. Various type of D-Feat switches are used to tell the module that the throttle is being applied, and to open up the butterfly valve if it is closed.
When the circuit is completed between the brown and yellow wire, or voltage is introduced on the brown wire only, this is the signal to open up the butterfly if closed. This action is indicated by a flashing Red LED on all modules or the wired remote on/off switch.
1st and 2nd Design Electronic Control Module |
ECM Properties 1) Key switched power to operate module 2) Separate ground wire for module * Note: Harness used on 1st and 2nd deigns have small black ground wire located near external relays 3) Uses remote battery power to operate solenoid through
external Hold and Pull relays 4) Has Cycle Feature to help keep butterfly valve operating freely (flashing Green or Red LED for 15 seconds after power up) 5) Uses a ground control circuit to open and close relays * Relays mounted to circuit board in control module box, not separate ground 6) All units actuate both pull and hold coils simultaneously 7) Has low pressure sensor 8) Uses D-Feat Switch to signal butterfly valve to open when throttle is applied 9) Has separate Circuit Breaker in battery power wire 10) Uses flashing Red LED to indicate D-Feat mode 11) Uses throttle to cancel Cycle Feature at power up 12) Uses brake-mounted pressure switch to indicate low back pressure * Has pressure switch attached to Blue and Orange wires running to ECM (only function is to monitor pressure) |
1st Design
Yes*
Yes
No
No
Yes
|
2nd Design Yes*
Yes
Yes
Yes
Yes
Yes
|
3rd Design
Yes*
Yes
Yes No Yes
| |||||
| ||||||||
Mechanical Operation and Testing 1. Butterfly won't cycle on when key powers up (2nd & 3rd Design) 2. Butterfly won't close
3. Butterfly valve will close, but will not remain closed
4. Butterfly valve will close, but no braking assistance (hold back) felt in vehicle
|